


Description
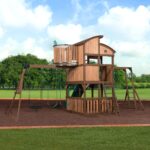
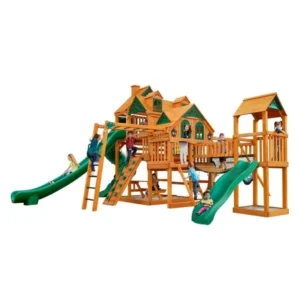
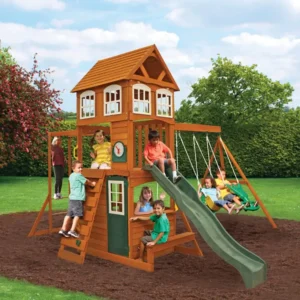
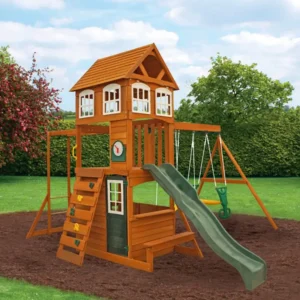
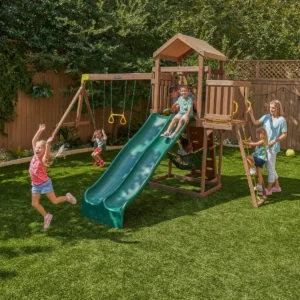
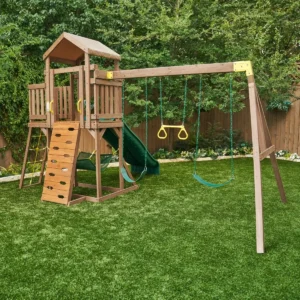
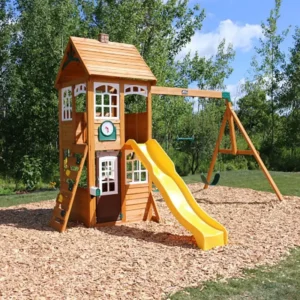
Inspire a whole new level of backyard play fun with the Skyfort Elite swing set by Backyard Discovery. This kids’ outdoor playset allows your little one to have the ultimate fort–right outside your back door. The backyard swing set comes fully loaded with an oversized upper clubhouse, an added crow’s nest and telescope. Kiddos can race up the switchback climbing tree, across the monkey bars, or down the wave speedy play slide. This wooden swing set provides a secret lair beneath the play tower that will keep their imagination soaring all year around.
Product Features:
- Easy Assembly – Supported by the step-by-step interactive BILT® app
- Oversized, spacious upper clubhouse
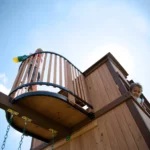
- 7′ crow’s nest lookout with attached telescope
- Monkey bars
- 10 ft. Super speedy slide
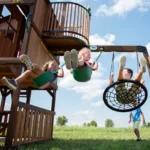
- 3-position swing beam with two belt swings and web swing
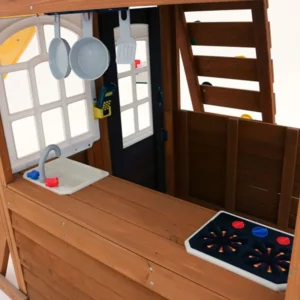
- Lower clubhouse with picnic table and sandbox area
- Easy-to-climb wooden step ladder
- Metal climbing tree
- Solar powered light with motion activation for extended play time
- Stain colors may vary
The Skyfort Elite is made from 100% cedar. With small, tight knot structure, your lumber will be less likely to develop small cracks emanating from knots. In laboratory testing, our durable cedar wood proved to be rot resistant and highly resistant to natural decay. All lumber is pre-stained for a smooth and clear appearance, as well as cut and stamped with the swing set parts number to help speed up the building process. Some pilot-hole drilling may be required. Our Safe-T-Fuse hardware makes assembly easy and secure. Its laminated swing beam is built strong, with steel clam-shell brackets to ensure that swinging is always safe.
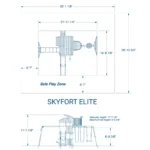
| Width | Depth | Height | |||||
|---|---|---|---|---|---|---|---|
| Assembled Dimensions | 21′ 11″ | x | 16′ 10″ | x | 11′ 7″ | Weight: | 751lbs |
| Warranty: 1 yr parts, 5 yr wood for rot/decay | |||||||
Box 1: 91 3/4″ x 28 3/4″ x 7 3/4″ Weight: 198 lbs.
Box 2: 91 3/4″ x 28 3/4″ x 6 1/2″ Weight: 198 lbs.
Box 3: 91 3/4″ x 28 3/4″ x 6 1/2″ Weight: 165 lbs.
Box 4: 91 3/4″ x 28 3/4″ x 6 3/4″ Weight: 190 lbs.


J. KrausJ. Kraus –
Long review, long build, but (hopefully) worth it. – With 3yr review
We shopped around very extensively for a swing set for our son (soon to be sons in July) and wanted one that was well designed, had lots to do on it, would fit our space, and had activity areas that our three year old could grow into. We looked at all the warehouse clubs in the area (Sam’s and Costco) as well as specialist shops and every online one we could find. We kept coming back to this one as the best one with the most varied features for the money.Delivery was well handled – since it’s so large it’s delivered in four boxes that are about 1’hX2’wX8’L. They were nice enough to slide it right into our garage to ensure nothing got wet.I was able to assemble it with at least one helper in about 14 hours of work but that was after I did my prep. Here’s what you need to do to prep for building:- Unbox, sort, and lay out all the wooden pieces. Each piece has a letter/number stamped on them (M24, H13, etc.) from the factory. Lay these out in order. One nice thing about this set, the roof panels and floor panels come already assembled and just need screwed down. That will save you at least two to three hours of building right there.- Sit down with the hardware, the instructions, a box of 100 zip-top sandwich bags and a sharpie. Go page-by-page and sort the needed hardware for a given page into a bag and label it as such. This might seem silly but the hour and a half my wife and I spent doing this while watching TV one night saved three hours + of time during the build.- Ideally, you need two cordless impact drivers – one with a good phillips bit and one that can take the included T-40 and T-30 bits used for bolts and lag screws. I made do with one impact but it was a lot of bit switching at times and got tiresome.- You need a drill as well. I think we had to drill maybe 15 holes per the instructions tops. Given how infrequent this is, you can get by with a corded drill for those few times you need it if that’s all you have.- Other needs: a good smooth-faced hammer (nothing waffle print as it will scar the wood). Having a miter saw helped with allowing me to cut a few guide blocks for the spacing on the pickets. The instructions tell you how much to space them, I think there were three different gaps for the different areas, and having guides helped me not worry about breaking out the measuring tape for each. I would have a 3/8 ratchet with a T-30 and T-40 socket available as well. There are a few spots where you’re driving lag screws and can’t get an impact driver around to get them.- The instructions are pretty good, but you need to check, double check, and then check again that you have certain boards in the right spots. There are pilot holes for later construction steps that MUST be oriented the right way. Look at your lumber, look at the steps very closely, and double check. The shading on the instructions makes if very difficult to see where the holes need to be at times. I probably lost an hour total over the two days flipping boards here and there.- Putting the slide together sucks. I’m sorry, there’s no other way to say it. Have help and take your time. Hanging it on the structure is one of your last steps so if you get frustrated, walk away and come back later. They have you put it together very early and then set it aside so as long as you don’t lose the hardware, you can come back to it later if needed.- I think we had three boards that tried to split on us during construction. It would be a good idea to have some small 3/4″ outdoor screws handy to bring any splits back together. Overall, wood splitting was not a concern at all.- Make sure the swing arm is level. The crows nest sits on top of it and needs to be level as well. We had to dig down about four inches at the end to make sure things were level. No big deal, but just make sure that side is square and true.- We used level dry blocks (big rubber foot-pads) under the corners and the swing and monkey bar feet. I highly recommend you get some of them as well. They will make leveling a bit easier and allow you to trim/mow without beating the wood up (it is pretty soft cedar).- The finish on the wood looked good but it will need soaked with a water seal product very shortly. I’m planning on doing that mid May prior to a short vacation so that it has time to soak in and cure before the kids are running all over it again.tl;dr great set that my son and the neighbor kids already enjoy!Two month update: the set has taken sun, lots of rain already, and even a hailstorm. It’s holding up very well. I noticed the finish starting to fade very slightly so I applied some Olympic premium sealer in clear from lowes – about $30 per gallon. Put it on with a garden sprayer and let it soak in for three days during a short time away. The wood took most all of it in readily and it looks great. Beads water like a sheet of plastic right now. I used 1.5 gallons to cover the whole thing. I’d highly recommend doing the same to any cedar outdoor set.18 month update – the set is holding up really well. We even moved it to the other side of the yard to make room for a major backyard improvement. We un-anchored it, detached the ladder, rock wall, and slide, and the rolled it across the yard on 1 1/2 pc. Took 45 minutes to move it 120 feet and turn it 180. After we moved it, I went around and tightened anything loose. I’m convinced most of the negative reviews are from people who didn’t tighten things well enough. Looks great in it’s new home.3yr Review – Just finished coating it with sealer and tightening everything up. This kit is holding up very well. We’ve even added things to it – a bucket and pulley, bell, steering wheel, drums, a periscope, and a metal wall to hang nerf guns with magnets glued on. My 6 and 2 year old love this kit, the neighbor kids love it, and my wife and I do not mind spending an afternoon a year sealing and tightening it all up. It still looks great.Quick notes:- I switched to a Valspar water based 6yr sealer this year. It darkens the finish a bit but it looks fantastic, goes on quick, and cleans up easier than the Olympic I used before.- We put artificial turf in the sandbox area, under the swings, under the steps, slide landing area, and at the base of the rockwall. I would highly recommend this if you don’t have it surrounded by mulch. I acquired ours at Costco to the tune of about $2,50/sq foot and have it secured down with landscape fabric staples.
mahatma –
Worthless!! Don’t waste your money!
After few days of use, I am convinced this thing is worthless. Slide is too bumpy and useless. Monkey bars are too high for any 5-6 year old to use, swings are too close to each other to use.. I would never recommend this to anyone.This product is perfect example of extreme cost cutting by a company. I would hire these guys, if i were looking to cut costs. They have tried to minimize their costs in every area from shipping boxes to number of words in instructions manual.I purchased this product recently. It came in 4 big boxes that were pretty cheap quality and were falling apart with the weight of the product. Highlights for me are as follows:Wood Quality – it chips and cracks easily. Some of the parts were already damaged, when I opened the boxes. I called the manufacturer, they promised to ship the replacement parts in 3-7 days. I ended up making my own custom parts.NOT WATERPROOF, you need to stain it with water resistant stain on your own. I think this is misleading because the product description states “all weather resistant” I guess rain is not part of the weather system.Slide – pretty hard to put together especially in cold weather. Overall slide is a back breaker, its too bumpy.The bumps are created by adding these small plastic poles, however the slide surface is so flimsy that you feel the full brunt of poles in your back.Crowsnest – not very sturdy. Pretty hard to get to. All entrances are really tiny.Monkey bars are useless, they are like 7 feet high. I think the opening to monkey bar is a safety hazard, i am planning to block that part off..Overall all the product is made of light weight material. It is designed with cost cutting mindset and not with end customer in mind. I think it will last may be a year or two. If you end up buying this product, make sure to read the instructions manual carefully. The instructions manual will test your attention to detail skill. Too many screws with similar part numbers..
Ginny E ChandaGinny E Chanda –
Decent parts, nice playset, good delivery but you need to be experienced to do it yourself.
Just got done putting this together and have climbed all over it, so let me leave a review while its still fresh.First, the delivery was scheduled and they actually called ahead to deliver it more than a week early, which was nice. The truck driver was helpful and helped me put it in a spot in the garage. There are four 8′ x 1′ x 2′ boxes that are four different weights. The one with all the metal pieces in it is the only one that’s really an issue moving around. So delivery was definitely 5 stars.Make sure you have all the tools you will need before you start. I did, but only by luck. You will need a good ladder, drill bit set (this calls for about 3 different bit sizes), hammer, good drill preferably with two batteries, socket wrench for the bolts, T square, level. I’m not sure if those are listed anywhere, but you do need a fairly good number of tools to put this together right.After reading a few reviews and hints, I unloaded the four boxes using half of my 2 car garage. All the wood pieces are lettered, with about 15 different letters. Some have 4 pieces for a letter, some have 50. There are a lot of Ms. So after putting them in a general order by letter/number, I started working. What I would have done to save time, as I did this all myself, would be to go through each step and just lay out your pieces and fasteners for every step and then start the steps. With two people it would be easy to have one person working ahead to gather the pieces and have the other assembling each step. The first half the project I spent A LOT of time hunting for each piece and each fastener for each step.The instructions have you start of putting together some of the larger side pieces; monkey bars, slide, swing bar, ladder, rock wall, small roof, bay windows. I didn’t but you may think about putting the bay windows together as you’re putting them in. They were a bit of an issue to make them fit right once they’re already together. Make sure you can get these pieces wherever they need to go before you put them together. I was working in the garage so taking out the monkey bars or the swing bar would have been a bit of an issue. Once those pieces are together, you will want to make sure you are putting this together where its going to go. You start to put the frame together and it gets large and heavy fast (that’s what she said). PAY CLOSE ATTENTION TO THE PILOT HOLES, SPACING OF HOLES, ETC. I spent a lot of time having to turn things around later or undoing things because the instructions were not explicit when a hole was an inch more to the right or left, or that a piece was mounted slightly differently. Sometimes the instructions call it out, sometimes it doesn’t. It got really frustrating. The assembly wasn’t really that difficult really, I would give it probably 4 stars. The instructions are pretty good most of the time and I only had a couple places (putting on the smaller roof and mounting the crow’s nest) that would have been far easier and safer with two people. I did put most of the crow’s nest together before putting it up, but that would be much easier with two people (almost died). That being said, assembly took 14 hours. I probably lost a couple hours having to undo/redo some things and then hunting for fasteners that my kid decided to throw around the lawn. So keep that in mind. I have seen videos of people taking 10 hours and others taking 30, 40, 50 hours, which makes no sense.There are plenty of extra fasteners so if you break/lose one of something, you’ll be okay. That may happen. I had a screw head that was all warped and another bolt head that popped off. The wood can split a little if you’re not safe and there’s nothing you can really do about that, but I am a 275 pound man and I was all over this thing (besides the crow’s nest) and it was plenty secure. That was without it being fully completed and secured to the ground. So that’s about it. I will include some pictures of how everything went together. I only give this 4 because of some of the annoyances with the instructions and the few small defects involved. It would really be like a 4.5.
Alexander and Irvin McCusker –
labor intensive but the effort is worth a hill of gold. Kids reaction was WOW
This project was HUGE!!! We agree with the other reviews that the instructions need some serious review and rework, however they are useable and you can build this project. Review the entire instruction book before you even begin this project. During each phase of the project skim ahead to the next step, because you will get a better view of the orientation of the boards. Look very carefully at the pilot hole layouts. You will need a lot of time, wine, and patience to complete this project. Not all the tools were listed, I found I needed a crescent wrench, a pair of channel locks a ratchet and a few sockets in addition to the few tools they had listed. Also, if you find that a bolt is getting a little to hard to screw in to one of the T-nuts then back it out and check to see if it isn’t striped, cross threaded, or has some Debree in it. I had two that got jammed up and stripped out the wood and would not lock in place nor could I back them out. This play set was strong enough to hold up two men around 190 lbs each while we climbed in around, on top of, thru the entire set while building it. Yes we where careful, but it took both of us and did not crack or brake. If you are lucky enough to have two cordless drills you will be able to have one set up with the torck bit that comes with it and one set up with the Phillips bit that comes with it. Also while you are at it get yourself a “large” #2 Phillips bit for the monkey bars portion. I stripped out 3 #1 Phillips bits before I ran to Ace hardware to get one and finish the monkey bars. One of the first steps we did was to organize ALL of the parts! I labeled all of the bags of hardware with the part letter, then I went page by page thru the instructions and cross referenced the parts. I wrote the part letters on each page this saved a little bit of time and frustration as we assembled it. You will find that the hardware comes in bags with a part number on it, then in the inventory list they give it a part letter, but you will not find that part letter in the assembly instructions. Instead they give you the part number on the baggy. So stressful if you don’t cross reference each step! There are four (4) large boxes that this set comes in, you will find that you need 6 or 7 part “M21”. But there is 3 of them in box one an 4 in box three etc. we found that if you check them off the box parts list as you pull them out it kept us less stressed and not hunting for parts.The kids first reactions were. WOW! They have been over this play set so much and yet every time they climb on an area it is as if it’s for the first time all over again. I’m sure the excitement will eventually ware off, but for now it is a little piece of heaven for them and us. They are outside having the time of there life’s getting some much needed outside time. We are on the deck sipping a glass of wine and not hearing the “I’m bored” or can we watch TV. This has been well worth the investment. If you do decide on this project then make sure you set aside plenty of time and patience. This is not a one weekend project, like I mentioned, it took two men almost a week to complete.
Mike –
Awesome swing/playset and very easy to put together!
After reading a lot of the reviews, I was nervous to purchase a set this large as I would be the only one to move all 4 boxes (at 150lbs+ each box) and put it together. Alot of the reviews I read had stated that it took multiple weekends or 30+ hours and several people to put it together. I’m sure that might be the case for some, but I am happy to say that it is definitely doable by yourself. It took me about 15-17 hours spread out over 2 1/2 days.When the 4 boxes were delivered in our driveway, I needed to find a way to get them down the sidewalk, along the garage, through the patio area and onto the deck as that was the best area to assemble that would be in close proximity to the spot in the yard we were installing it. If you need to move the boxes by yourself, just drop the hand truck on all four wheels. It was easy to lift one side of a box onto the hand truck and then the other and then walk it to the deck area with very little physical exertion.I spent the first 2 hours unloading each box and categorizing the wood by letters and numbers. That is an obvious must but one thing that I found to be a huge time saver when actually building the playset was to take some time and go through each step to sort the hardware. I grabbed a whole bunch of ziplock bags and placed each step’s hardware into it’s own bag (step 1 (bag 1), 2 (bag 2) etc). It cuts down on so much time because now you can take the corresponding bag for the step your on and dump it on the table and start building. If not, you are sorting through 6 or more bags for each step and counting out the pieces you’ll need. This is the biggest advantage I had to get this built quickly and I highly recommend it.Power tools, power tools, power tools! You absolutely need them to build this set. I can’t even estimate how long it would take with only using the hands tools they provided. Years maybe? A couple portions of the build were challenging to do when only building by yourself. The movement of the swing support, monkey bars set-up, and the porch roof. It can be done, but you just need to go slow and be careful when securing it as you don’t have the support of a 2nd person holding it.Overall I am extremely happy with this playset and would highly recommend it. It was straight forward to build (print out PDF directions from online) and there were no hiccups along the way. Everything fit how it should and all holes lined up where they should have been. It feels very sturdy and our kids LOVE it. When it’s raining and they are inside, they stare out of the back window and talk about playing on it.Recommendations: Seal this as soon as you get it. It is Chinese cedar and definitely looks like water will cause some damage over time. I used Thompson Water Seal and the water just beads right off of it now. I added extra supports underneath the floor on the 2nd story. It definitely feels secure for our kids (4.5, 3, and 2 years old) but when their older cousins are over, I think the extra weight would make me nervous on the deck floor. I used (2) 2×4 boards and screwed them in from the top of the floor and sides. Just an added sense of safety on our part.
Christian Orcutt –
A good play set, a lot of work
Just finished this over the weekend and am happy with it. And my 6 year-old daughter loves it, as do the neighborhood kids. I thought I’d pass along a few things I learned along the way:This is advertised as the Skyfort but it is actually the Skyfort II. When my boxes were delivered labeled as Skyfort II and I mentioned this to the customer service rep (who was otherwise wonderful), I was curtly told that the picture on the Amazon page matches what I got. My guess is that the company originally sold the Skyfort and that model was discontinued but they kept this page up and started shipping the Skyfort II. I only mention this because a lot of the reviews on here are for the original Skyfort (some mention things that didn’t come with this Skyfort II model).The wood is Chinese cedar, which is actually a type of cypress. It is apparently very decay resistant but is cheaper than red cedar because it takes less time to mature. The wood comes stained red but you will definitely have to seal it to waterproof it; the warranty is void if you don’t. The warranty also states that you have to sand any rough areas before sealing, and that you are required to seal it once or twice a year depending on your climate. Also – the warranty is 5 years for the wood but after the first year, you have to start paying a percentage for replacement wood, up to 80% by year four. If you’d like more details, you can find the manual online.It’s completely doable to put the whole thing together on your own but it does take a while. It took me a 6 hours to inventory everything and organize it and then 15 2-hour evenings to stain the pieces. I unpacked all the boards and arranged them all by letter in a garage, and then got two 15-drawer plastic cases to arrange the fasteners. And I sill needed like 20 labeled plastic cups for the rest. There’s a great review on here titled “We Got what we Wanted! Best Deal in this price range” that gives great advice on how to build the whole thing, though I’m pretty sure it’s about the Skyfort.The directions have you build the monkey bars, slide, rock wall, etc. first so I stained and built those and then put them outside. Then, for the structure, I stained as many boards/instruction manual steps as I could fit on garage tables and sawhorses. I let the stain dry overnight, and then put the stained boards together the next night in a stack with a post-it saying which steps these boards were for (like steps-15-21). And then started on the next batch. I wound up with 10 or so liftable piles to bring outside for the structure.Actually putting the structure together, attaching all of the extra stuff, and finishing everything took almost 2 days. I found the directions to be very good (though I had to often look ahead a few steps to determine exactly which way to fasten boards) and was definitely impressed by how all of the screw and bolt holes lined up. And one crucial thing is to make sure to check that the whole structure is level every once in awhile.My overall impression is that it’s a good deal for the price but it is definitely a big project – you have to put in a lot of time and effort. I gave it four stars because I was unpleasantly surprised that the warranty required me to stain the whole thing first, and that the wood is called “cedar” when it’s not what anyone would expect when they order cedar.
Christophe A Cole –
Most Playset for the price, but not american cedar.
This thing took some work to get together, and the instructions are not clear which directions holes are supposed to go. They use Chinese cedar, which has a lot more soft wood, and much less of the heartwood that people think of when picturing American cedar. Less than 10% was heartwood. The design is well thought out for safety, and they include extra hardware in case you lose, drop or break a bolt, nut, Tbolt, etc. It’s a very nice design, and the price is awesome for all the features that comes with it. The slide, swings, and glider are of high quality, and the bay windows are great, and I’m thinking of buying and screwing in some Plexiglas to make them real windows.FYI, you may need assistance at delivery, I’m pretty strong and used to moving heavy items, but the pallet this was delivered in weighed 750 lbs. That can be broken down into 4 8’x18″x9″ boxes that weigh almost 200 lbs apiece, but an 8′ box is still hard to move even when its light. Instructions say team lift. It can be put together by oneself. Not recommended, but it is possible. It took me about 2 weekends. Also, make sure the ground is level where you want to put it. I had to spend 3 of those days grading the area with a shovel, a level, and a very long 2×4.
TinaTina –
Methodical Layout is Key! I LOVE THIS SET!!
I really love this set. Does it take forever? SURE! But… here’s what I did:After its arrival, my best friend and I used bedtime, and our massive garage, to lay everything out. Very first step? Print the PDF version (found online) of the manual, page by page. I just printed the actual steps pages, and not all the rest. So, use your “print pages” option to save yourself a few trees. Next, I purchased fold top, cheap sandwich bags and had a couple sharpies handy. Then we opened the boxes, and pulled the packing slips out (one box was missing a packing slip, so we just used process of elimination). There is no rhyme or reason for how this all is packed, other than it fits perfectly, into 3 boxes, like a puzzle.The steps have you put together big items first (monkey bars, swing set assembly, rock wall, rear ladder, crow’s nest base and slide). Then, it goes on to step by step for how to build the clubhouse. After the main structure is together, you attach all the things. We took the first page(s) and found all of the items needed to construct the first big item. We laid them all into a pile, found all of the nuts/bolts/locks/etc and put them into individual baggies (clearly labeled). We piled them all together, and put the corresponding papers on top of it. Then to the next large piece’s parts and pages… and the next, and the next. Soon, all of the main items were placed into piles, with every piece of wood and hardware, with the pages that told you how to construct them, laying on top.Next, we got to the instructions for each step of the main structure/clubhouse. Since you can’t really “group” them together, we literally went page by page. Each page has what wood pieces and hardware are needed, listed on the top. Some piles had 1 piece of wood, and a bolt or two… some piles had MULTIPLE. (Oh… each baggie, with hardware, I would write something like “monkey bars – bolt # and what size/quantity”… just look at the photos for all of these examples, cause I don’t want to explain it wrong). But, we just went page by page. Laying it all out, in order. This took us 2 nights… just the two of us (and a few adult beverages).Here was my thought process… I had myself, my husband, and 2 other couples, willing to come over and help FOR ONE SATURDAY. What I didn’t want? One single book, being passed around, people looking for things, using wrong pieces, losing things, etc. If I had them for a day, I needed to make the MOST of it. It totally worked! It was the most methodical madness…ever. All the comments from friends were “I’m so glad you had this all so organized!”They all came over Saturday morning. They brought their drills and bits (and coffee). We got started right away (about 11AM). Each couple grabbed one of the larger item piles, and put together whatever it was (my one piece of advice? Pay attention to the slide… bolting the wood to the bottom? You need to leave a little slide at the end. The piece of wood doesn’t sit flush with the end of the slide. I missed this. Thankfully, a friend had a good idea with how to fix it, without making more holes in the slide… thank you, friend!). After all of the items were constructed, we set them in the front yard.It was now on to constructing the clubhouse. This part was harder to work with all 6 hands. But, some were working, and others were grabbing items/tools/instructions/etc. We decided to build most of the clubhouse on the driveway, for a level surface, and easy access to all of the steps, that were still laid out in the garage. Once we got to a point that we felt we should move it, we brought it down (again, refer to photos). From there, we had people bringing each step down, and crews alternating working on the rest of the steps (it was pretty hot that day, so the switching off was nice). But, it was great to have some extra company and encouragement. 😉 Toward the end, we had all the crews connecting the big items, simultaneously, and the lone man up in the crow’s nest (that thing is seriously the most time consuming part of it all). While they were finishing all the last details, I ran to Home Depot, and picked up 15 50lb bags of play sand. I think we wound up only using 12-13 bags, for all of you wondering. By 7PM, every last item was done, the sandbox was filled, and the kids were having a blast.Later, we got some 5” edging, and edged out an irregular shape, around the play set. It took about 6 yards of play bark to fill it with a few inches (makes my mama heart feel better, in case anyone falls off). All in all, I’m estimating it took about as long to lay out the parts as it did to put it together. However… it was completely worth it. I would NOT do it any other way. Nothing was lost, broken, installed wrong (except ALMOST the bottom board of the slide). A few pieces were a little warped.. but none were broken. This is WOOD. Not every piece will be perfect.Do I regret this purchase? Absolutely not! My kids are like “can we go out and play on our park, before dinner?” They love it. They are 3.5 and 2, and play just great on it. It is PLENTY tall. Adults can fit… even up in the crow’s nest. Can I stand up, completely (I’m 5’11”)? No. But we have older children come play on it, and no child has been “too big” for it, yet. I think the oldest child we had was like 10.5? Perhaps older. The slide is long… even I get going a little bit on it. Before I added the wood chips, I could dangle from the monkey bars (there are 4 bars), without touching the ground. With wood chips, I just barely have to pick up my feet. The girls are too small to do the monkey bars alone. I’ve seen some people block off the entrance to it, on the club house, and leave them off altogether, but my kids don’t attempt without us, so we opted to leave it on, for their older friends/cousins. They learned to do the rock wall quickly, and love it. They eat on the picnic table a lot. Downfall? Their friends can NOT keep the sand in the sandbox. I’m debating constructing something that keeps it closed, so those friends can’t get into it… I HATE cleaning up the sand from the lower deck. The seesaw swing is awesome, since the girls aren’t big enough to “pump” on a normal swing really well, yet. They get going on that double swing like crazy, so I don’t always have to be out to push them on the other 2. The telescope is fun. It isn’t magnified, or anything, but nobody has complained.I can see us getting MANY years of good use out of this. I’m so happy I didn’t get a smaller set. Truly… for the price, you get SO many options for them to play on, and kids of all sizes can fit. It is very very sturdy, and looks beautiful in the yard. I am happy to answer questions!
LidiaLidia –
Best playset!
This playhouse is the best thing we have gotten our kids! We had to replace our old one due to it being unsafe and finally decided on this due to the price point (it was $1800 when I bought it prior to Spring). I read multiple reviews and definitely took a few for myself, here is what I 100% would recommend.1. Separating the wood into individual steps, being able to just grab the next stack was so much easier than trying to find everything that day. I did this the morning of our first day because of my work schedule, I couldn’t do it the previous night. That took me about 3 ish hours. I inventoried everything a week prior so I knew I had all undamaged pieces.2. Separate hardware, it was a pain to individually package each step into baggies but it saved SO much hassle the day of and helped to not lose them the day we assembled. This took about four hours to accomplish by myself but it was doable. Trust me, you want to do this. I would have lost a lot of pieces if I hadn’t.3. Use the Bilt app! I tried to just use the paper while my husband used the app, but it would have been more efficient to just use the app for both of us. It’s way too easy to turn something the wrong way and then have to either drill new holes or hope the wood doesn’t split.4. Have help, we didn’t have much help and my husband and I were able to get it up in about 20ish hours split between two days. My husband was a mechanic and I am decently handy, but it was not easy. On steps where I was putting up something small, my husband was working on the next step and that helped quite a bit.I had no idea that this playset would be so big! I know it has dimensions listed, but I expected it to be smaller. I’m not complaining, but I can’t jump and reach the monkey bars (I am 5’3″). The slide seems a bit flimsy but does well with even all three children going down at once.I hope I never have to put another one together, but all the work was worth it watching my kids play and have fun. I hope this review helps you with your decision for a playset for your family!
SickPup404 –
Great play set with plenty of activity space!
Finally got this set completed and wanted to share the best of the tips gleaned from other reviewers, plus a couple of my own.- First off, to the reviewer(s) that recommended separating hardware into sandwich baggies, THANK YOU! This was probably the best thing that saved a bit of time, but mostly frustration. Separate all the hardware by step, then when you get to a step, just grab the wood and the baggie.- Something to add here is to look at your hardware as you’re separating it. You’re looking for screwheads that have been filled in with molten metal. I had to stop five or six times as I am assembling to dig through the spare hardware bag looking for a screw that the bit would go into.- Also, we decided to hit this with Thompson’s Water Seal before assembly. All the wood from all the boxes at once. It was a bit tough to store it while drying in the garage, but doable. We started to use a deck sprayer (looked like a good idea in Lowes), but it was putting it on too thick. Just get two gallons of sealer and a decent 4″ wide brush. Vinyl gloves help and you can seal the edges of several boards at once.- Assembling the slide can be difficult. You’ll need some helping hands. Laying the slide sheet in the sun for a while helped with the bends you need to make.- Once you’re ready to separate your boards, the piles for the M and H boards are the biggest, so leave plenty of extra room for them.- Get some Level Dry Blocks, especially if your play set location isn’t perfectly level. I bought six large ones and ten small ones for about $170. I needed to get four more small ones to cover all the feet in the uneven areas. The Level Dry web site has a dealer locator, and there’s online sellers.- I had a few wood pieces that were missing labels or mis-drilled, but no big deal. Some of the letter stamps were also hard to read.- Some of the steps are hard to tell the orientation of the boards. You can skip ahead in the manual to figure it out, but you need to do it carefully. Something that helps is to download a PDF version of the manual and you can zoom in better.- I used a Dewalt cordless impact drill with two batteries to put everything together. I used a magnetic quickchange bit to swap between the Torx bits that come with the set and a #1or #2 Phillips.- Something not covered in the manual is when you put the crows nest deck on the swing arm, there is no step that says to put two screws in the board where it attaches to the clubhouse. There are spare screws and I used two of them that were about 2 inches long.- I did all of the subassemblies (rock wall, monkey bars, slide, ladder, swing arm) in the garage on the nice level concrete floor.- I also started the clubhouse assembly in the garage. The basic “cube” frame was all assembled, tightened, and made plumb, square, and level while flat in the garage. We then carried it out to the yard to the blocks that were already level in the yard.- An important note! The small L brackets that are used in several places inside the clubhouse are actually used on the outside of the crows nest rail. I drilled through a 1 inch thick piece of framing for the crows nest door before I realized the screw and T nut were too short. Make sure to put the L brackets on the outside.- Also, another important note! The small L brackets are not square. There is one leg longer than the other by about 1/8 of an inch. If you put an L bracket on a board and it’s too long or too short take the bolt out and spin the bracket around and it will fit perfectly. I didn’t figure that out until one of the last brackets.- If you are going to use the sandbox, we put down weed block fabric first and stapled it to the boards. We also used 14 of the 50 pound bags of sand and it’s about 1/2-3/4 full.- You’ll definitely need a hammer, framing square, 4′ level, 7/16″ drill bit, 1/8″ drill bit, a drill or impact driver, and patience!- As others have noted, this place it is quite sturdy! I weigh about 195 pounds and am 6′ tall and I can stand up in the clubhouse and on the crows nest and there are no issues.- Once you get the clubhouse built and you start putting on the subassemblies, you’ll need extra hands for the porch roof. Also, the monkey bars are the hardest to attach and level because they are so unwieldy at this point.- One final note. The last two Clubhouse soffit boards before you put the roof on are difficult to figure out how they are oriented and where to attach. There is almost no gap on one side once you get the roof on, and the crows nest side has about a 3 inch gap. We had our “grand opening” with about five neighborhood kids, and it was a big hit! We’re thinking about adding a couple of solar powered lights just to jazz it up a little bit!
mcragun –
Kids still enjoy it a year later
We put this together last fall and I did a majority of it on my own so it took longer than it would with a few people but was still manageable.My kids now 7&5 are learning the monkey bars and doing flips on the handlebars. Several boards have split and popped over the freeze and thaw of the year but that can be expected with wood. Just a matter of screwing the boards down again.We buried some crystals and other things in the sand for the kids to find and they enjoy the treasure hunting. They use the ladder more than the rock wall but when other kiddos come around the whole thing is used. I honestly thought the crows nest would be used more but maybe it’s bc we have a rule of only 1 kid at a time due to the height.Anyhow… overall I’m happy with this play set. I think it’s going to last us for many years to come.